Thursday, July 21, 2011

Family Numbered T-shirts

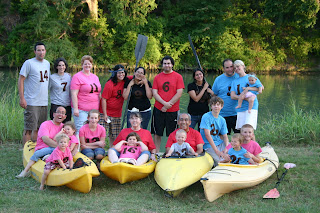
Okay, so I got this idea from a friend.  She had a family reunion a year or two ago and they made t-shirts for each person in the family.  They each got a number and their number was the order in which they entered the family (by marriage or birth).  And they took their family pictures in them.  I thought it was so cool that I wanted to do it for our reunion.

Each family got a color (which is what we did at our last reunion, so I kept them the same color), and then the numbers were brown (so we were all part of one big unit). 
It was fun to figure out every one's number. 
Something else that would have been fun (but we didn't have time because we were busy having too much fun) would be to play games and call out peoples numbers.  You get the idea...
The kids loved their shirts and in a year or son, when they have grown out of them, we hope to make a family blanket by cutting the t-shirts up into squares.

So this is how I did it.  I got every one's shirt (had to figure out every one's size, and bought them on sale half off.)  Then I figured out every one's number.  THEN, I drew out numbers onto paper until I was happy with how they looked.  Notice, my husband is number 14 and the 4 is quite small compared to the other numbers.  Oh well, just gives it character, right?
Then I cut out the numbers to use as my pattern when I cut the material.  (I used knit fabric)  Then I counted up all my numbers that I would need to cut (ex: there were 12 one's to cut out).  Then I cut them all out.  THEN, I centered every one's number on the t-shirt with pins and sewed them on.  I used thread the color of the t-shirt to help the number pop out even more.  I have to say, they turned out super cute and I am so glad I did the work (lots of work), cause it was all worth it!


Happy Crafting!
Father's Day last minute decor

For Father's Day, I really wanted to make this banner:


but alas, I was a little crafted out by the time we left, so we did a last minute throw together.  And even though I wanted it to look awesome, the guys really didn't care and thought this this was awesome! 
 Then I got the idea for their gift also on www.tipjunkie.com , but I can't seem to find it anywhere.  Basically, we put candy in a cup and made a little flag that said
"Happy Father's Day".  (We also made an "Awesome Uncle" candy cup)
I wish I could find the site, because it looked a lot classier :)
On the front of the candy cup is a Hershey's candy bar, wrapped in a tie wrapper and we had to use medical tape to secure it to the cup. 
(like I said, it was a little "on the fly" but the guys felt spoiled)

 My mom wanted to give the guys gifts wearing tiaras. 
Happy Crafting!

Happy Birthday Party for Everyone at a Reunion

At our family reunion, we decided it would be fun to have a birthday party for everyone since we are spread all over the United States and don't get to attend each others parties.  So, we did the typical things, nothing too special, but we had a blast. 
You can make a board like the one below:  Buy the board at the hobby store, paint it and either order the vinyal letters online or use your cutter to make them.

Our Family Tree Wall Hanging

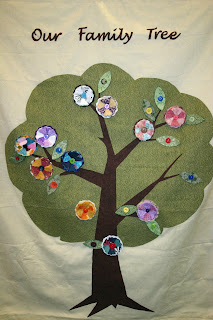
We had a family reunion on my side of the family last month and I made a lot of things for it.  Here is the first one I will post about.  I wanted to give a gift to my parents for getting the reunion together and being such awesome grandparents.  So I decided to make a family tree wall hanging for them.  Each flower represents a female and the leaves are the males.  This is all I have for you, as it was unfinished when we left them.  We each signed our name on a small piece of card stock that was secured to a small ribbon to hang off the button holding each person leaf or flower. 
It was really fun to put the flowers together with my sister in laws and nieces, as we each picked out the fabric to make them with and all helped assemble them. 
I hope to get a picture sometime soon from my Mom after she has hung it in her house.
Happy Crafting!

Wednesday, May 18, 2011

Flower vase make over

I was looking for ideas for inexpensive crafty gifts to give some ladies that I was visiting and I came across this idea:


I changed my flowers a bit.  I can't find the site where I learned how to make them.  You simply cut out a circle of silk and then take a lighter and hold the flame close (but not touching) the edges of the fabric.  It will curl from the heat.  Watch out for your fingers!  Then I took a cool bead for the middle of the flower petal.

 These two vases are recycles glass bottles (ketchup and fluff jars)

This is a vase from the dollar store.  They all turned out so cute.  Oh, and the fabric...
I am shortening a long skirt that just so happened to have cool sheer fabric!  I will post a pic when that is done too!

Happy Crafting!

Saturday, May 14, 2011

Fabric covered mouse pad

I also work from home part time.  I use a black table for my desk and it has absolutely no grain for my mouse to pick up.  So, I had to figure out a way to  make a cute mouse pad, because the one we have is UGLY...
So I searched a few tutorials and they all pretty much say the same thing.  I got a piece of card board (luckily, it was already in the shape that I needed), and hot glued a piece of felt on top.  Then I got my fabric and  made sure to leave about an inch of the fabric all around the edges.  I then hot glued the bottom felt piece into place and tucked the over hanging fabric in as I went.  And that is all!  I love my new mouse pad!!!
Happy Crafting!

Fabric Business Card Holder

I needed a better way to hold my business cards than at the bottom of my purse or stuffed in my wallet getting crumpled.  I found this tutorial:
 

I love my new card holder! 
 

 On the top are my Quilts by Kista cards,
the bottom holds my Crafting with Kista cards!

Happy Crafting!